Convert a spreadsheet or CSV file into a Marketing List in Dynamics 365 - Strings
In a perfect world, spreadsheet lists of email addresses should never exist, in reality they do. Especially in the world of marketing! I’m often asked for a way to import a list of Contacts or Leads into a marketing list. Not so bad if they are all new (the fax field hack trick works like a charm 😉) but often some already exist and duplicate records hurt my soul.
I set out out on a mission to create a flow that took a CSV file that uses the display names from Dataverse and turned it into a populated marketing list. The fields are flexible. Existing records will be added to the list, new records will be created then added. And of course it works for Contacts or Leads.. Nothing will be hard coded, nothing will be repeated, and custom fields will be supported.
In other words: I fell down a rabbit hole about 2 months ago trying to do something with flow that is probably way better handled with real code, I’ve only just found my way out.
Strings only (for now)
This post is going to focus on getting your import working for string (text) fields only. My next post or two will add the enhancements you need to also populate choices, owners and lookups too, but for the sake of keeping this post for being so damn long you get cramp from scrolling - it will have to wait. I promise I have already worked that bit out so no false promises here.
Part 1: Upload a file & prepare to transform


Instant flow
Create an ‘Instant’ flow that starts with ‘Manually trigger a flow’ and add the inputs as follows
Type - with options for ‘Lead’ and ‘Contact’ (not sure how to add the dropdown list? Check here)
Marketing List Name
File

Important CSV information
OriginalCSV - Compose
First we will convert the CSV file into it’s plain text format
base64ToString(triggerBody()?['file']?['contentBytes'])LineEnding - Compose
Then depending on the type of CSV that was uploaded we need to work out which symbol is used to indicate a line ending. I definitely found this on a blog/forum post somewhere and I cannot remember for the life of me where, so whoever/wherever this was - thank you!
if(equals(indexof(outputs('OriginalCSV'), decodeUriComponent('%0D%0A')), -1), if(equals(indexof(outputs('OriginalCSV'), decodeUriComponent('%0A')), -1), decodeUriComponent('%0D'), decodeUriComponent('%0A')), decodeUriComponent('%0D%0A'))
Environment URL
ODataURL - Compose
I know there are a million better ways to do this either dynamically or with an environment variable etc. - for the purposes of getting this other magic happening, its just text and I’m not sorry!

Veracious Variables
HeaderString - Initialize Variable String
CreateContactOrLead - Initialize Variable Object
HeaderStringDisplayName - Initialize Variable String
first(split(replace(outputs('OriginalCSV'),'"',''),outputs('LineEnding')))Part 2: Display names -> Logical names
One of the hardest lessons I had to learn during this was that headers are easier to change than JSON properties (in the world of Power Automate). So before we go in all guns blazing to the JSON part - first lets switch out the Display Name headers e.g. ‘City’ into the corresponding Logical Name address1_city. Remember, no hard coding ,and all custom fields supported.


Get the Lead or Contact metadata
To be able to convert our display names into logical names we need to query the metadata of the table which we are importing. The user has selected either lead or contact when uploading the file, so we take this, plus the ODataURL from earlier to pull back the Display and Logical names for all the fields on the chosen table.
GetDisplayNames - Invoke an HTTP request with Azure AD
Method: GET
https://@{outputs('ODataURL')}/api/data/v9.2/EntityDefinitions?$select=DisplayName,LogicalName&$filter=LogicalName eq '@{toLower(triggerBody()['text'])}'&$expand=Attributes($select=AttributeType,DisplayName,LogicalName)I’ve used this in similar previous posts here (which also explains to you how to create the connection too).

Turn Display Names into Logical Names
Using the split() function we can turn the string of display names from above, into an array which allows us to translate each display name into a logical name
Assumptions: header names are not translated & you do not have more than one column with the display name - sorry not sorry.
ForEachHeader - Apply to each
split(variables('HeaderStringDisplayName'),',')HeaderName - Compose
item()Filter array
From
first(outputs('GetDisplayNames')?['body/value'])?['Attributes']
Value Left
item()?['DisplayName/UserLocalizedLabel/Label']Value Right
outputs('Header_Name')AppendLogicalName - Append to a string variable - @{first(body('Filter_array'))?['LogicalName']},
@{first(body('Filter_array'))?['LogicalName']},
Logical Name String
A little bit of tidy up to remove the trailing comma from the HeaderString you populated in the loop above, then setting the variable with this value to use later on.
HeaderStringRemoveTrailingComma - Compose
substring(variables('HeaderString'),0,sub(length(variables('HeaderString')),1))HeaderStringLogicalNames - Set Variable HeaderString
outputs('HeaderStringRemoveTrailingComma')Part 3: CSV -> JSON
I found this handy little blog post on how to covert CSV into JSON using power automate which works great. However, George Doubinski wanted to flex his developer skills and wrote me a neat little custom connector that does this instead. CSV goes in -> JSON comes out. The GitHub repo for this beauty lives here and CRM Tip of the Day post pending with the juicy details.
P.S I know its possible to do things with CSV files in flow but they usually rely on it being hosted in a specific location in OneDrive/SharePoint which I really wanted to avoid. I like JSON better and so does the Dataverse connector.

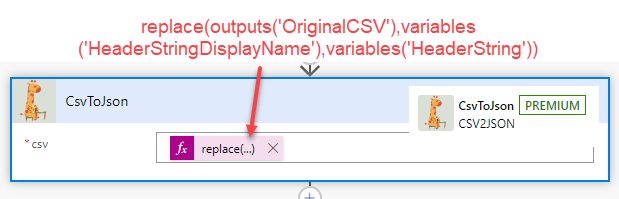
Switch the header names and convert
Regardless of how you choose to do the CSV to JSON conversion, it’s really important that you swap out the header Display Names for the Header Logical Names that you created above.
replace(outputs('OriginalCSV'),variables('HeaderStringDisplayName'),variables('HeaderString')) Part 4: JSON -> Dataverse
So now you have a big lump of beautifully fromatted JSON with logical names and values. Time to find or create the Dataverse rows (without mapping specific fields or selecting a specific Table name) to add to our marketing list.


Create a Marketing List
One of the inputs from the flow is the name of the marketing list - we need to create the marketing list and ensure the Member Type is set correctly too
CreateMarketingList - Add a row with Dataverse
Table Name: Marketing Lists
Marketing List Member Type
if(equals(tolower(triggerBody()['text']),'contact'),2,4)Name
triggerBody()['text_1']Even better if: check for an existing marketing list first before creating a new one (hint: use the same pattern as we do for ‘Search for an existing Lead or Contact’ below)

Search for an existing Lead or Contact
First, we need to check if there is already an existing contact or lead that simply needs adding to the marketing list, if not then we can create it. Either way they will be added to the Marketing List later.
UpdateOrCreateRecord-AddToMarketingList - Apply to each
body('CsvToJson')CreateContactOrLead-CurrentItem - Set Variable CreateContactOrLead
item()SearchForContactOrLead - List rows for Dataverse
Table Name
concat(tolower(triggerBody()['text']),'s')Filter Rows
emailaddress1 eq '@{items('UpdateOrCreateRecord-AddToMarketingList')?['emailaddress1']}' and statecode eq 0Row count: 1

Combine new and existing contacts/leads in a marketing list
I know, I know, it looks like a lot but this is the last step - I promise! Staying within your loop from the previous step. Based on the search result from above we can determine whether to create and add to the marketing list, or just add to the marketing list. Here’s some lumps of syntax - scroll down for the supporting imagery that was too big to go in as a two columnlayout.
MatchFound - Condition control
empty(body('SearchForContactOrLead')?['value'])If Yes
RecordODataExisting - Compose
if(equals(triggerBody()['text'],'Contact'),first(outputs('SearchForContactOrLead')?['body/value'])?['@odata.id'],first(outputs('SearchForContactOrLead')?['body/value'])?['@odata.id'])If No
CreateContactOrLead - Add a new row with Dataverse
Table Name
concat(tolower(triggerBody()['text']),'s')Row Item
variables('CreateContactOrLead')RecordODataNew - Compose
outputs('CreateContactOrLead')?['body/@odata.id']AddToMarketingList - Relate rows with Dataverse
Table Name: Marketing Lists
Row ID
outputs('CreateMarketingList')?['body/listid']Relationship
concat('list',tolower(triggerBody()['text']),'_association')Relate With
@{outputs('RecordODataExisting')}@{outputs('RecordODataNew')}
Hello CSV -> Marketing List!
Thanks for sticking around brave one, behold the magic that is turning a CSV into a Dynamics 365/Dataverse Marketing List.

Was it worth it?
Maybe, maybe not, but I learnt a lot of things along the way and came out the other side in one piece - I think future Amey will be grateful one day. The hole digging chronicles will return soon with another post or two on how we can enhance this flow to also set up Lookups, Owners and Choices (Option Sets) via the same method. Also, you could make it even better by creating a custom page in your model driven app that allows the user to upload a file and create the marketing list, via this flow, without ever leaving their app.