Make the Activity Timeline Control Useful in Model-Driven Power Apps
This isn’t brand new stuff - its been around since August 2020, but it completely slipped under my radar until recently. The Activity Timeline is actually a huge awesome PCF control called ‘Timeline Control’. PCF controls - we love you. There are heaps of settings for you to easily tweak and adjust but here is my top four for maximum aesthetic gains and user enjoyment.
Activity Timeline ‘Out of the Box’
So you chuck your activity timeline on a form and fire it up - this is what you get. A few years ago there was very limited flexibility on what else you could do with it so I always accepted ‘it is what it is’ but now there is so much more! Check out the massive range of configurable options available now from the new solution explorer (finally something I don’t want to switch to classic for!).

Open the form from your solution and click on the activity timeline, the right hand panel will load a wealth of settings and features for you to explore!
Clean up to speed up
By default all the activities are enabled to show on the timeline including ‘Fax’, ‘Letter’ and any crazy custom activities you may have hiding in there. Of course things wont show in the timeline until you create that activity so what’s the problem? Well it kind of already tells you in the settings pane - but I will reiterate it for people who don’t like to read instructions. Clean it up by clicking on the activity and uncheck the ‘Enable’ box.
“Selecting more than 10 activity types will slow down your timeline. Right now, you have xx selected.”

Not all activities should be created from the timeline
Often their are examples of where an activity should be ‘seen’ on the timeline but not allowed to be created from the timeline. When it comes to user experience “less is more”. Reducing the amount of unnecessary information users need to process can massively improve their experiences and therefore boost user adoption. So think carefully about which activities need to be created from the timeline and show only those. Clean it up by clicking on the activity and uncheck the ‘Create directly from the timeline’ box. But leave ‘Enable’ Selected so that they still show on the timeline.

Think about the context of the timeline too - in this example I have a custom activity called ‘Counselling Session’. This activity is only relevant in context of an active Counselling Service - never just directly created against the Contact, so make it go away.
Hide the blobby things (aka ‘Persona with Initials’)
These look great is everyone has a lovely profile picture on their outlook profile, you see a nice image of the ‘Owner’ of the activity but it is rare to find this being the case. Instead you get the ‘Persona with Initials’ option which is a randomly coloured blob with the owners initials. Confusing and a little offensive especially when you have admin accounts creating/owning things… In this case you can change the timeline setting Profile Picture to ‘Always Hide’

Customise the activity cards
My absolute favourite - I think this has been possible to some extent for a while but its so well hidden in classic that I have never found it before in my 6 years in the model-driven app world. The flexibility here is awesome!
Option 1: use the Default form
The default form varies for each activity and often shows the most relevant items in context of that activity (if its an OOB activity). But even with the items being shown chosen for you, there is still lots to play with. You can choose which of the items show on the activity card (always, never or only on expand), whether the titles are shown, what the main heading says and whether the status reason tag shows up or not. To do this, click on the activity and select the pencil icon next to the ‘Default Form’

Sometimes the status tag isn’t relevant - for tasks it makes sense but maybe not always for phone calls or appointments. Obviously you can tell your users to mark the activities as complete but if that is unnecessary admin it seems unfair to show scary red messages saying its ‘overdue’. Maybe the description and date are important to show all the time and instead we just show them ‘On expand’.


Option 2: use a Custom form
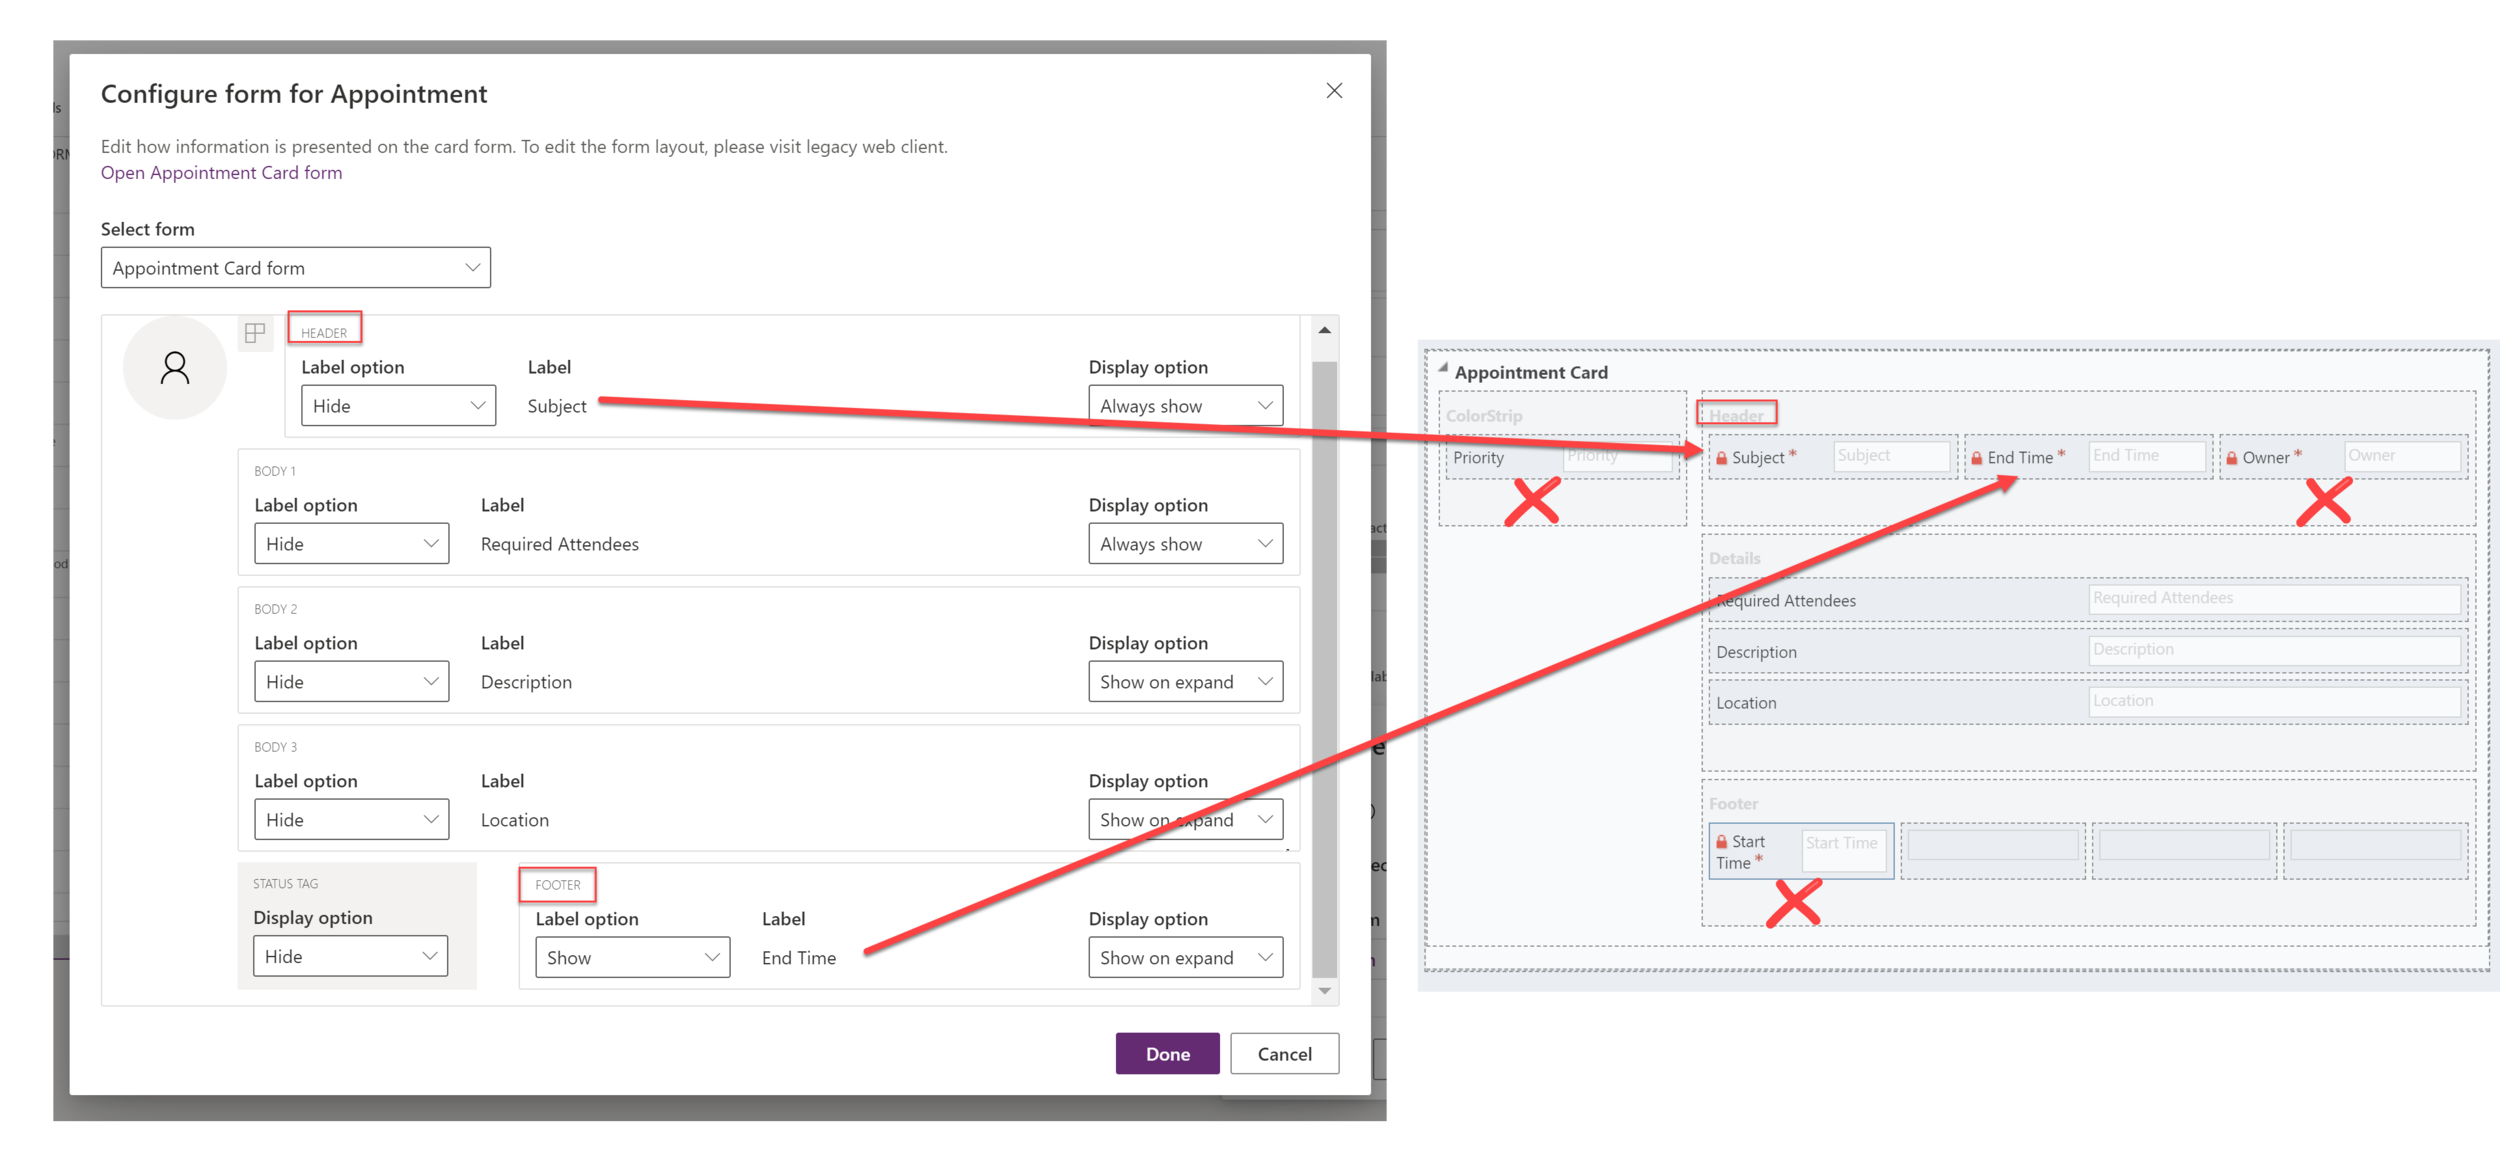
Perhaps what’s on the Default form isn’t what you want to show on the timeline. Maybe you have added some custom fields or even a custom activity - different businesses have different requirements so the Out of the Box’ default isn’t always the right thing. We can customise that on the timeline too! To do this, click on the activity and select the pencil icon next to the ‘Default Form’. Now in the top right, change ‘Default form’ to another form option - in this case its the ‘Appointment Card form’. Then select ‘Open Appointment Card form’ from the top purple linked text.


If you don’t have another option then might first need to create a ‘Card Form’ for the table
When you are customising the form it will switch you back to classic (shocking.). Something to be aware of here as things don’t map very logically from the Card Form onto the Activity Card form options. Anything in the ColorStrip or Footer is ignored. the first column from the header becomes the header and the 2nd column from the header becomes the footer (of course…!). Anything else in the header after items one and two, is ignored. Be sure to save & publish your card form updates, then head back to the modern solution explorer for the activity timeline configuration.

Now you can update the display and label options for all the columns you chose to add to your form (except the ones in the Footer/ColorStrip/after the second Header column)
Now you have a wonderfully clean, customised and informative card on your timeline. You can repeat this for any activity on the timeline too so don’t stop there!

How snazzy is that? I challenge you to go and ‘pimp’ your next customers activity timeline. I would love to see what you can do to reduce the noise and improve the experience for your users. Your questions or comments always welcome! ☺