Dataverse Choice & Choices Conversion in Power Automate
Well its been a while since I blogged about Choice(s)/(Multi-select) Option Sets/Picklists so its time to (finally) share how you can create a very helpful child flow that will help you convert Choice or Choices column values from Label to Value and also Value to label for any table or column in Dataverse. You can call this child flow from any other flow you are building when a choice or Choices conversion is required.
I previously posted about Converting Dataverse Choice(s), (Multi-select) Option Sets, or Picklists in Power Automate with Custom Actions but I know that installing third-party solutions is not always feasible depending on the governance and rules your organisation is run under. It makes sense and it’s a perfect excuse to smugly build your own Dataverse Choice & Choices Conversion flow instead.
Roll on down to the bottom for an ended to end image of the flow steps and also some examples of the data conversions you can do.
Create your flow inside a solution
This is a life rule always, but particularly in the case of child flows. If you don’t put your magical conversion child flow inside a solution, then you will not be able to use it as part of other flows (which also need to be inside a solution). The solution is to always use a solution. Ok I’m done preaching now, lets begin!

Create an ‘Instant’ flow
Select the trigger ‘Manually trigger a flow (flow button for mobile)’. Add the following inputs:
Name: LogicalNameColumn
Type: Text
Hint text: eg. preferredcontactmethodcode or lab_primaryindustry
Name: LogicalNameTable
Type: Text
Hint text: e.g. contact or lab_cpdactivity
Name: Conversion Type
Type: Text
Drop-down list of options: Label to Value; Value to Label (How to add a drop-down list of options)
Name: Choice Label or Value
Type: Text
Hint text: The label or value you want to convert

Initialize a variable
Add a new action Variable > Initialize variable
Action Name: Response
Name: Response
Type: String

Get the environment URL
Instead of using a static value, environment variable or making it an input to the child flow, we can dynamically determine the environment URL using a list rows action. I used Business Unit because inevitable and environment cannot exist without one, but the result is not even dependent on one being found as we use the URL from the action rather than the results. Add a new action Dataverse > List Rows
Action Name: GetODataURI
Table Name: Business Units
Select Columns: businessunitid
Row count: 1

Compose the Metadata Base URL
Add a new action Data Operation > Compose
Action Name: MetadataBaseURL
Inputs (below)
https://@{urihost(body('GetODataURI')?['@odata.context']) }/api/data/v9.2/EntityDefinitions(LogicalName='@{triggerBody()['text_1']}')/Attributes(LogicalName='@{triggerBody()['text']}')

Connect to HTTP with Microsoft Entra ID (preauthorized)
Add a new action HTTP with Microsoft Entra ID (preauthorized) > Invoke an HTTP request.
You will first need to create the connection - this is a connection reference which is defined per environment and will be set up during the solution import to another environment without making unmanaged changes or completing post deployment steps. You cannot use an environment variable here. Identify ‘Your Environment Base URL’ by opening up one of your model-driven apps and copying everything before /main.aspx… from the URL e.g. https://farmers.crm6.dynamics.com.
Base Resource URL: [Your Environment Base URL]
Microsoft Entra ID URI (Application ID URI): [Your Environment Base URL]
Then ‘Sign in’
Reminder to use HTTP with Microsoft Entra ID (preauthorized)

Don’t say that I didn’t remind you!

Invoke an HTTP Request for Attribute Metadata
This action identifies the type of column we are working with.
Choice = PicklistAttributeMetadata
Choices = MultiSelectPicklistAttributeMetadata
Action Name: GetAttributeMetadata
Method: GET
Url of the request: outputs('MetadataBaseURL')

Compose the Column Datatype
This will be helpful later on when sending back the translated response. Add a new action Data Operation > Compose
Action Name: Datatype
Inputs: (below)

Invoke an HTTP Request for Choice or Choices Metadata
Now we know the type of column we are working with, we request the metadata we need. Add a new action HTTP with Microsoft Entra ID (preauthorized) > Invoke an HTTP request
Action Name: GetChoiceMetadata
Method: GET
Url of the request: (below)
@{outputs('MetadataBaseURL')}/@{outputs('Datatype')}?$select=LogicalName,SchemaName,AttributeTypeName&$expand=OptionSet($select=Options)
Educational interlude

For a bit of context - here is some examples of the data ‘Labels’ and ‘Values’ for Choice & Choices columns
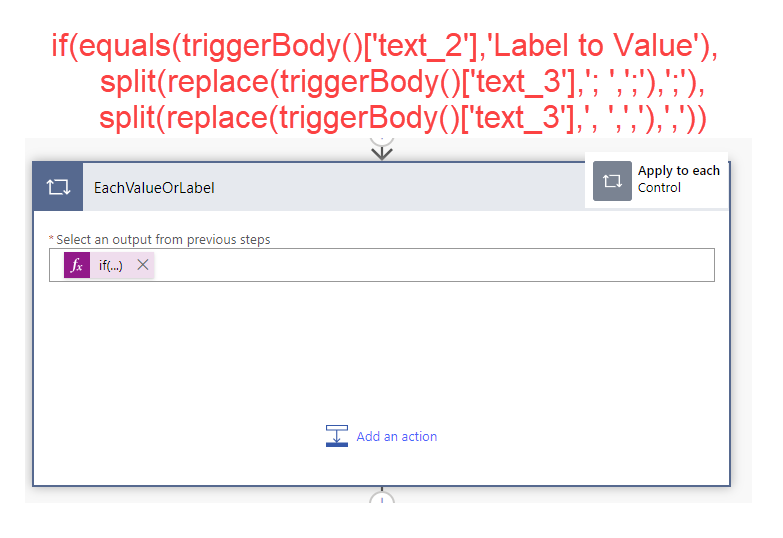
Apply to each label or value
As the flow support single and multiple choice inputs, we need to convert each value accordingly. For Choices the input will be comma separated if is Value to Label and semicolon separated if its Label to Value. For a single choice the split() function will not find anything to split and it will loop only once. Add a new action Control > Apply to each
Action Name: EachValueOrLabel
Select an output from previous steps: (below)
if(equals(triggerBody()['text_2'],'Label to Value'),
    split(replace(triggerBody()['text_3'],'; ',';'),';'),
    split(replace(triggerBody()['text_3'],', ',','),',')
)
Add a condition to check the conversion type
Depending on if we are converting Label to Value or Value to label we need to search the reference data differently. Add a new action Control > Condition
Action Name: Label to Value
Condition: (below)
triggerBody()['text_2']
is equal to
Label to Value

If yes, filter on the label
In the Yes branch of the condition, add a new action Data Operation > Filter Array
Action Name: FilterChoicesLabelToValue
From: (below)
body('GetChoiceMetadata')?['OptionSet']?['Options']
Condition: (below)
item()?['Label']?['UserLocalizedLabel']?['Label']
is equal to
items('EachValueOrLabel')


Append the value to a string variable - comma seeprated
Now we need to append the value onto the ‘Response’ string variable we created earlier, separated with a comma.
Add a new action Variable > Append to a string variable
Action Name: AppendValue
Value: (below) followed by ,
coalesce(first(body('FilterChoicesLabelToValue'))?['Value'], -1)
If no, filter on the value
In the No branch of the condition, add a new action Data Operation > Filter Array
Action Name: FilterChoicesValueToLabel
From: (below)
body('GetChoiceMetadata')?['OptionSet']?['Options']
Condition: (below)
item()?['Value']
is equal to
int(items('EachValueOrLabel'))


Append the label to a string variable - semicolon and space seperated
Now we need to append the label onto the ‘Response’ string variable we created earlier, separated with a semicolon.
Add a new action Variable > Append to a string variable
Action Name: AppendLabel
Value: (below) followed by ‘; ‘ (semicolon+space)
coalesce(first(body('FilterChoicesValueToLabel'))?['Label']?['UserLocalizedLabel']?['Label'],'')
Tidy up the response string
After the apply to each loop, we need to tidy up the string to remove any trailing commas or semicolons and spaces. Add a new action Data Operation > Compose
Action Name: RemoveTrailingCharacters
Inputs: (below)
substring(variables('Response'),0,sub(length(variables('Response')),if(equals(triggerBody()['text_2'],'Label to Value'),1,2)))

Respond with the converted Label or Value
The magic is done, now to send back the answer to to the parent flow with the converted value or label. Add a new PowerApps > Respond to a PowerApp or flow action.
Add the following outputs:
Type: Number
Title: Label to Value Response - Single Choice Only
Value: below)
if(and(equals(triggerBody()['text_2'],'Label to Value'),equals(outputs('Datatype'),'Microsoft.Dynamics.CRM.PicklistAttributeMetadata')),int(coalesce(outputs('RemoveTrailingCharacters'), -1)),null)
Type: Text
Title: Value to Label Response
Value: (below)
if(equals(triggerBody()['text_2'],'Value to Label'),outputs('RemoveTrailingCharacters'),null)
Type: Text
Title: Label to Value Response - Multiple Choice
Value: (below)
if(and(equals(triggerBody()['text_2'],'Label to Value'),equals(outputs('Datatype'),'Microsoft.Dynamics.CRM.MultiSelectPicklistAttributeMetadata')),outputs('RemoveTrailingCharacters'),null)

Always respond
Just in case anything goes wrong, we always want the flow to respond. Select the ellipsis (…) on the ‘Respond to a PowerApp or flow action’ Choose Configure run after. Update the actions to allow the ‘Respond to a PowerApp or flow’ action to run after any condition - is successful, has failed, is skipped & has timed out.

Test it Manually
One of the many things I love about building child flows is that they are so much easier to test manually by providing inputs without having to create or modify something to trigger the automation.

A good out of the box example to test is the ‘Preferred Method of Contact’ on the Contact table.

Using the above table & column as an example manually test your flow to turn Label into Value:
LogicalNameColumn: preferredcontactmethodcode
LogicalNameTable: contact
Conversion Type: Label to Value
Choice Label or Value: Fax

The same for Choices columns too, for example using the above table & column as an example you can manually test the flow to turn Values into Labels

LogicalNameColumn: lab_tradingregions
LogicalNameTable: contact
Conversion Type: Value to Label
Choice Label or Value: 2,3,4
And also Labels into Values:

LogicalNameColumn: lab_tradingregions
LogicalNameTable: contact
Conversion Type: Label to Value
Choice Label or Value: Africa; Asia; Caribbean; Central America; Europe; North America; Oceania; South America
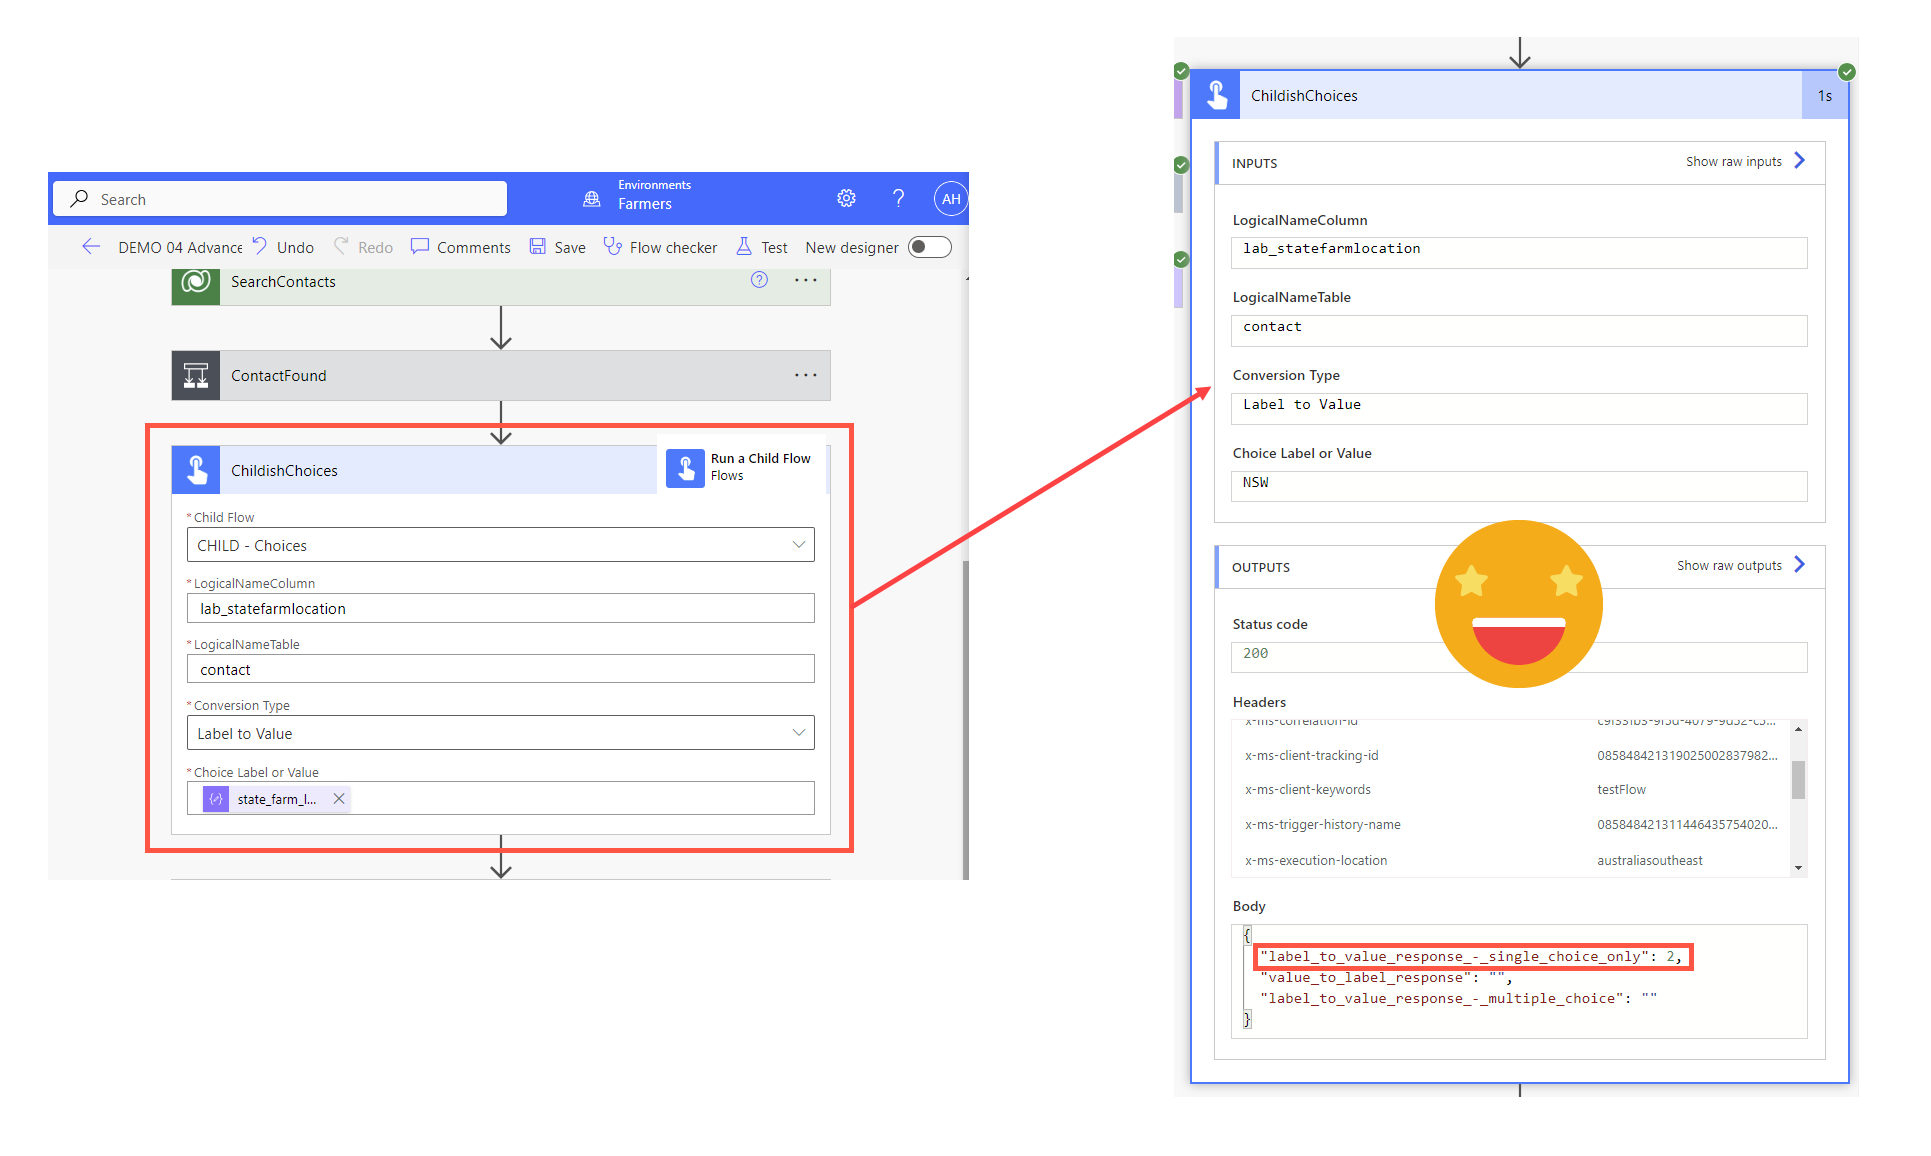
Use a child flow inside a flow
Now you can use your child flow by calling it from another flow whenever you need the conversions. Just add the Action Flows > Ran a Child Flow, fill in the value required either statically or dynamically and you are good to go:

Finally, in case you got lost along the way there is an end to end screenshot of the choice & choices conversion flow from the steps above
