Create sales tasks and phone calls directly from Real-time Dynamics 365 Marketing Journeys
Marketing metrics are values marketers can monitor to measure the performance of their campaigns. Two common ones are lead conversion rates and cost per lead. For leads to be converted it takes the combined efforts of both sales and marketing teams. Handing over a good lead to the sales team at the right time is key in achieving high lead conversion rates and lowered cost per lead. Knowing when a prospect needs further enrichment is also equally important to ensure the marketing team can act and nurture prospects into leads. Wouldn’t it be good if we could automate activities and notifications as part of our real-time marketing journeys to help make delightful marketing metrics happen?
This post will focus on creating a phone call but this can be any other kind of activity or record you might use such as a task, email notification, note etc. Native Dynamics 365 Marketing functionality to create sales activities such as tasks and phone calls from within real-time journey is expected in preview February 2023, general availability is yet to be announced. Also, since we are delving into the world of ‘custom triggers’ some further reading around Testing & Deploying Custom Triggers will be handy for you to check out.
TLDR: Activate a custom trigger to call a flow that creates the sales activity from within a marketing journey
Create the trigger
As with all good things in Dynamics 365 Marketing, it all starts with a Custom Trigger
Create the trigger ensuring you select ‘When a customer interacts with a website/app’ (3), then add the attributes to the trigger (5). We will use these attributes later to drive the logic of how we create and assign the phone call activity. Bear in mind that all attributes must be populated (with a dynamic of static value) before a trigger can be used in a journey and there is not currently a way to provide a list of options for the input so choose wisely on how you assign the attributes data type.
Assign to Lead Owner - True or false
Assign to User or Team Name - Text
Day Until Due Date - Number
Phone Call Description - Text
Phone Call Subject - Text
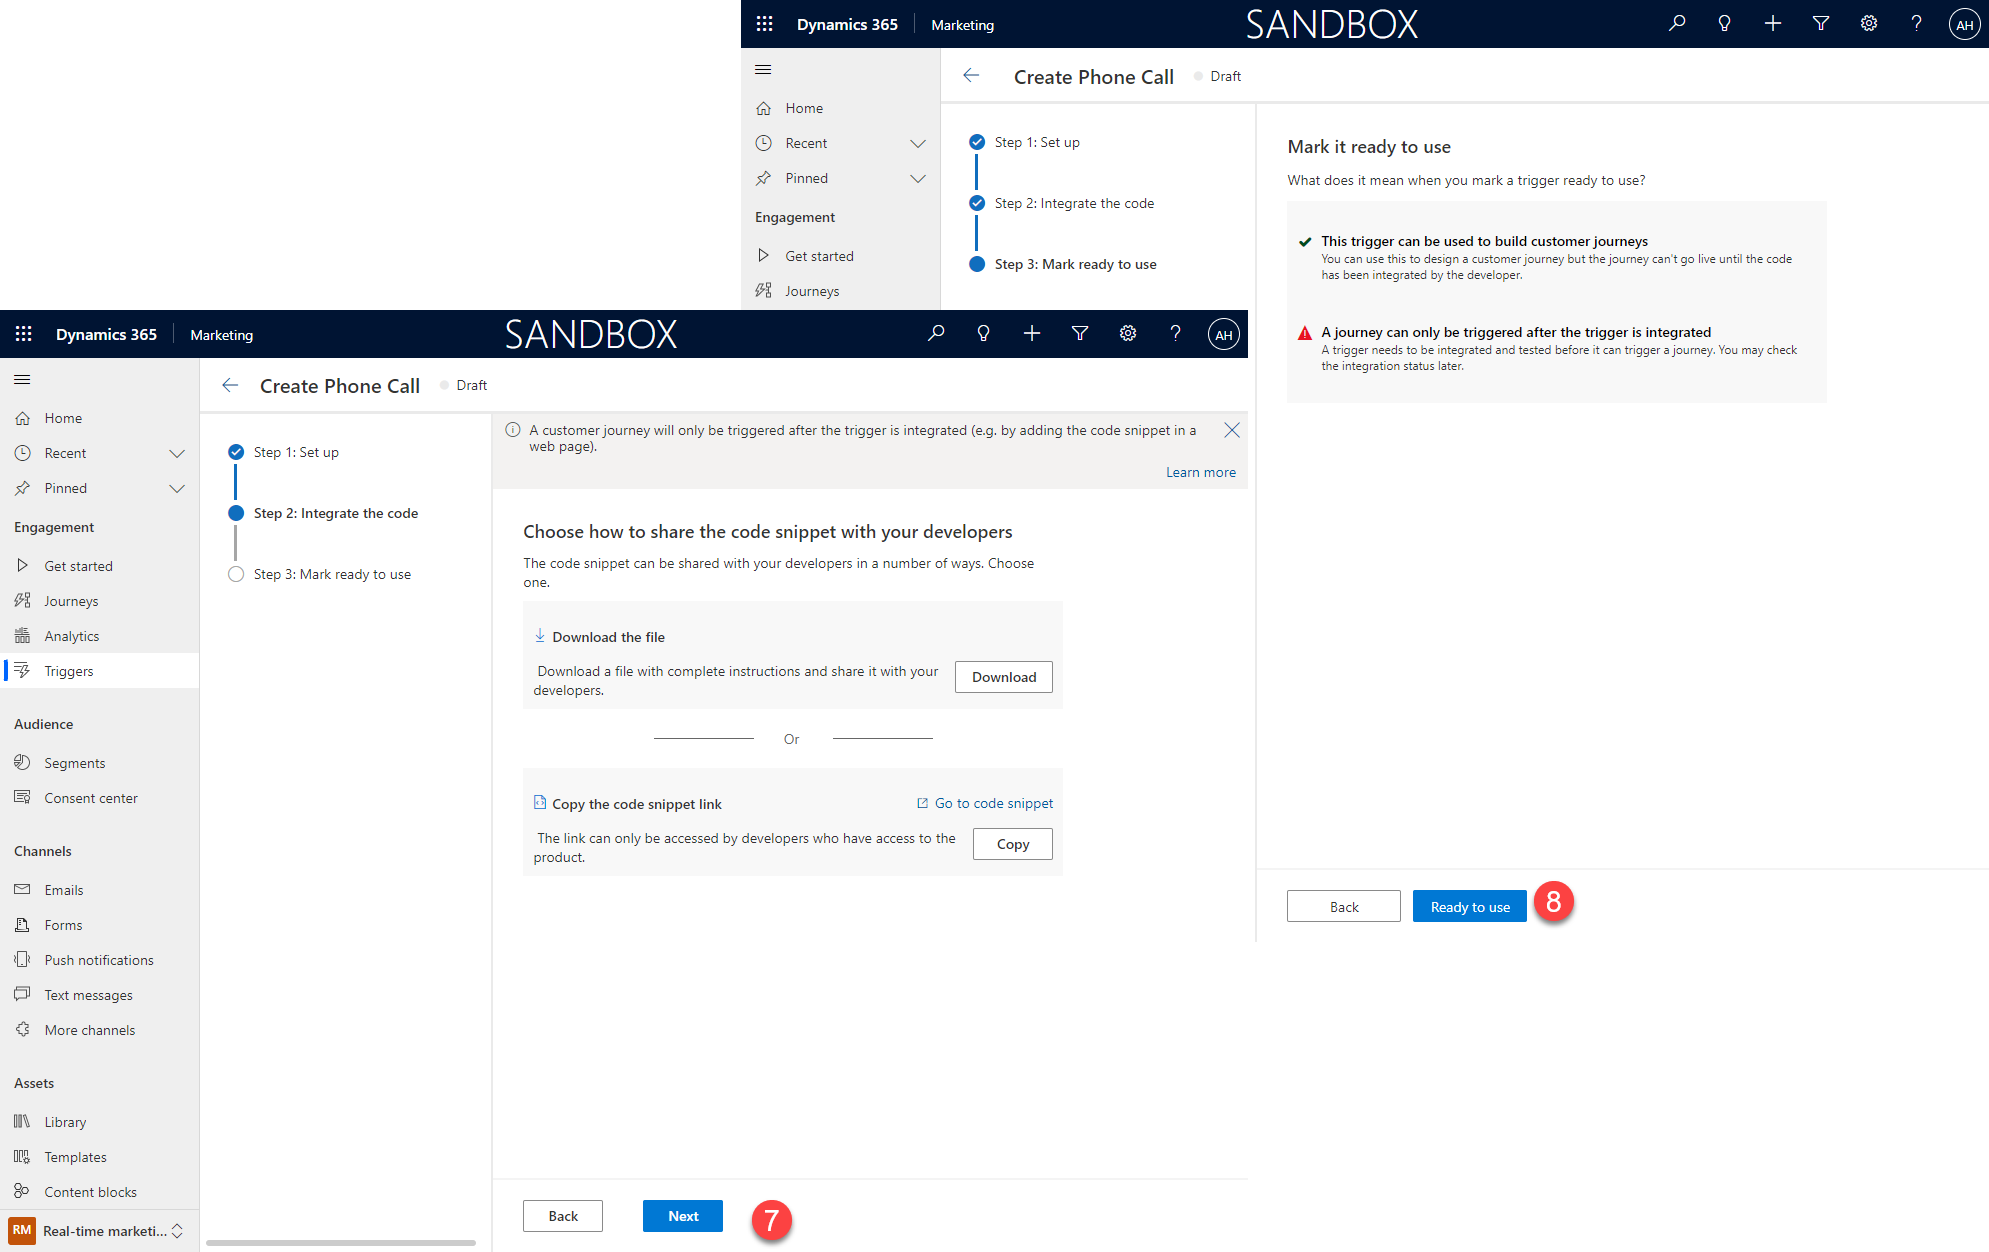
Select Next for ’Step 2: Integrate the code’ (7), then select ‘Ready to use’ (8)
Create the activity when the trigger is triggered
Now we need to make the trigger do magic things when it is triggered from marketing to creates the sales activity, in this case the phone call activity (full end to end screenshot of the power automate flow can be found at the end of this post if needed).
Respond to the Custom Marketing Trigger
Create a new Automated Power Automate flow with the trigger ‘When an action is performed’ in Dataverse. Make sure that you have set your trigger as ‘Ready to use’ otherwise it won’t show up here.
Trigger: When an action is performed (Dataverse)
Catalog: Cxp
Category: Custom
Table name: (none)
Action name: Create Phone Call
Get the owner of the lead in the journey
As this trigger Customer Data type is a Lead, we can use either msdynmkt_profileid or msdynmkt_signaluserauthid for the lead GUID. Using select columns to only grad the attribute(s) we need.
Action: Get a row by ID (Dataverse)
Table name: Leads
Row ID: triggerOutputs()?['body/InputParameters/msdynmkt_profileid'] or triggerOutputs()?['body/InputParameters/msdynmkt_signaluserauthid']
Select columns: ownerid
Set the lead as the recipient ‘To’ of the phone call
This ‘ActivityPartyArray’ may look a bit scary but I promise it is magic. It allows us to set up who the phone call is ‘To’ and ‘From’ in this case, but the same format is used across all Activity tables such as Email, Task and Appointment. Linn Zaw Win has done a very detailed blog post about this step by step so definitely check that out too.
Action: Initialize variable (Variable)
Name: ActivityPartyArray
Type: Array
Value:
[
{
"participationtypemask": 2,
"partyid@odata.bind": "leads/@{triggerOutputs()?['body/InputParameters/msdynmkt_signaluserauthid']}"
  }
]
Set the fall-back owner of the phone call activity
This is our fall-back owner of the phone call in case the ‘Assign to User or Team Name’ input cannot be attached to an eligible user of team in Dataverse, or if the ‘Assign to Lead Owner’ is set to Yes.
Action: Initialize variable (Variable)
Name: PhoneCallOwner
Type: String
Value: @{outputs('GetLeadOwner')?['body/_ownerid_value@Microsoft.Dynamics.CRM.lookuplogicalname']}s/@{outputs('GetLeadOwner')?['body/_ownerid_value']}
Assign to Lead Owner?
How we assign the phone call owner depends upon whether the ‘Assign to Lead Owner’ attribute was Yes or No. If this is Yes we don’t need to do anything ele on the wonership front, we already sorted it out in the step above where we set the PhoneCallOwner.
Action: Conditon (Control)
Name: AssignToLeadOwner
Value:
@triggerOutputs()?['body/InputParameters/msdynmkt_assigntoleadowner']
is equal to
true
Search for the User
If ‘Assign to Lead Owner’ was now, then we need to go search for the specific user or team under ‘Assign to User or Team Name’. The attribute asks for a user or team name, so this could indeed be either. Rather than adding an additional attribute that the user has to specify if it’s a user or a team, we remove some complexity from the user experience in marketing and therefore handle it within the flow instead
Action: List Rows (Dataverse)
Name: FindUser
Select columns: systemuserid
Table name: Users
Filter rows: fullname eq '@{triggerOutputs()?['body/InputParameters/msdynmkt_assigntouserorteamname']}' and isdisabled eq false
User found?
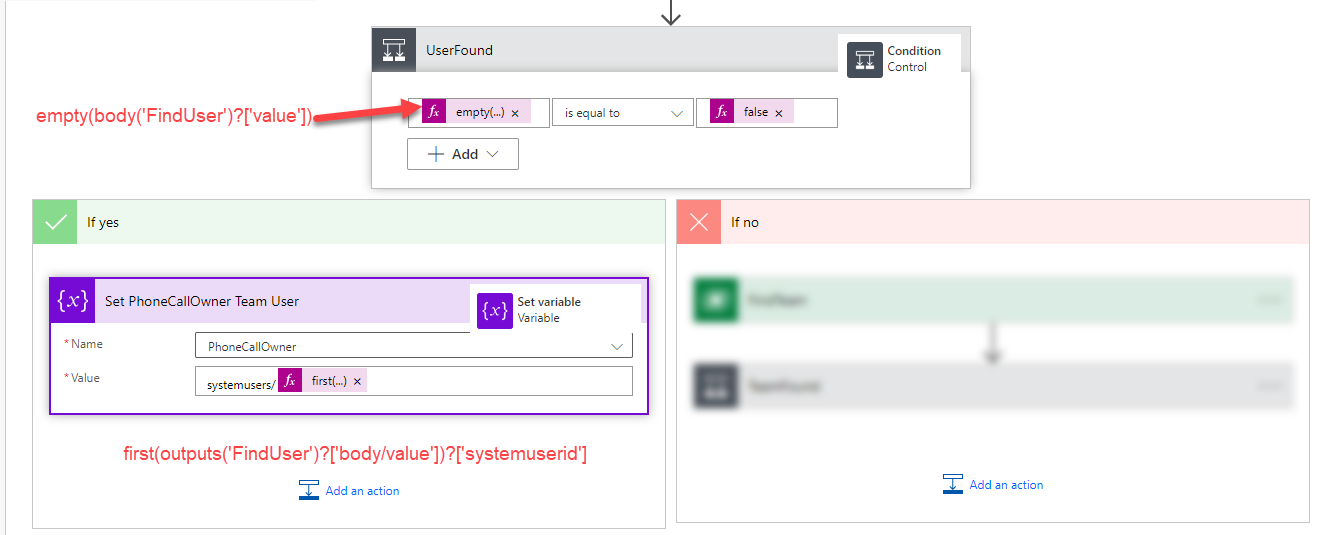
We need to check if the ‘FindUser’ action from above found a user, if it did we can use that to update the PhoneCallOwner variable
Action: Conditon (Control)
Name: UserFound
Value:
@empty(body('FindUser')?['value'])
is equal to
false
Action: Set variable (Variable)
Action Name: Set PhoneCallOwner Team User
Name: PhoneCallOwner
Value: systemusers/@{first(outputs('FindUser')?['body/value'])?['systemuserid']}
Search for the Team
If the user was not found in the step above, then we need to search for the team instead
Action: List Rows (Dataverse)
Name: FindTeam
Select columns: teamid
Table name: Teams
Filter rows: name eq '@{triggerOutputs()?['body/InputParameters/msdynmkt_assigntouserorteamname']}'
User found?
We need to check if the ‘FindTeam’ action from above found a Team, if it did we can use that to update the PhoneCallOwner variable. If no result was found (maybe the name was typed incorrectly, or the user has been disabled), we have already set the fall-back option as the lead owner so the phone call will be correctly created but maybe not correctly assigned. This is the final step of the ‘AssignToLeadOwner’ condition
Action: Conditon (Control)
Name: TeamFound
Value:
@empty(body('FindTeam')?['value'])
is equal to
false
Action: Set variable (Variable)
Action Name: Set PhoneCallOwner Team
Name: PhoneCallOwner
Value: teams/@{first(outputs('FindTeam')?['body/value'])?['teamid']}
Is the phone call owner owner a user?
Now that the above steps are complete the PhoneCallOwner field will be populated with either the Lead Owner, the specified User Name or the specified Team name. Below the ‘AssignToLeadOwner’ condition action we have another condition to work out if the owner is a user or a team. If the owner is a User we can also set the same user as the person who the phone call is ‘From’, otherwise we leave it blank as the ‘From’ cannot be a Team.
Action: Conditon (Control)
Name: AppendCallFrom
Value:
@substring(variables('PhoneCallOwner'),0,4)
is equal to
syst
Action: Append to array variable (Variable)
Action Name: AppendCallFromUserToActivityPartyArray
Name: ActivityPartyArray
Value:
{
"participationtypemask": 1,
"partyid@odata.bind": @{variables('PhoneCallOwner')}
}
Create the phone call
Now we have everything we need to create the phone call, assigned to the correct user, linked to the correct lead, with the required due date and the appropriate subject/description as defined from the marketing journey
Action: Add a new row (Dataverse)
Name: CreatePhoneCall
Table name: Leads
Subject: @{triggerOutputs()?['body/InputParameters/msdynmkt_subject']}
Description: @{triggerOutputs()?['body/InputParameters/msdynmkt_description']}
Direction: Yes
Due: @{addDays(utcNow(),int(triggerOutputs()?['body/InputParameters/msdynmkt_dayuntilduedate']))}
Owner (Owners): @{variables('PhoneCallOwner')}
Regarding (Leads): leads/@{triggerOutputs()?['body/InputParameters/msdynmkt_signaluserauthid']}
Activity Parties: @variables('ActivityPartyArray')
Now is an excellent time to Test your Custom Trigger.
Use the trigger within a journey
I’m not going to go too detailed on this part as Megan V Walker has already written a lovely blog post on how to activate custom triggers within journeys but some key thing to consider specific to my example (and the reason this ended dup being built) are as follows:
A) Create an email with one or more ‘call to action’ links
More often that not, the decision to whether to create the activity from the sales journey depends upon the users actions. If the email goes unopened it’s probably not worth following up with a sales call, whilst if they active click on a specific link they have clearly expressed some interest in whatever you were telling them - act accordingly.
B) Respond differently according to which links was clicked
The two call to actions we want to respond to on this email were to either read a blog post or book a call. There are also other links such as ‘unsubscribe’ or ‘privacy policy’ which we most likely do not want to follow up on with a call.
1) Add an email with one or more link you want to branch the behaviour on
2) Add a ‘Respond to an action’ element, set:
Choose a branch condition type: ‘The previous message gets an interaction’
Choose an interaction: Email Link Clicked
3) You may need to save at this point, then a light bulb should appear with ‘Specify the link clicked create branches’. Select the ‘create branches’ link so that you can define actions per email link
Schedule phone calls with hot and warm leads
The email in my example has many links, it’s important we act according to what was clicked:
‘unsubscribe’ would be a good point to trigger another custom action that updates the lead status reason to ‘No Longer Interested’ to stop further nurturing or sales efforts.
‘book a call’ link starts with a form being completed and therefore being handed off to a different customer journey that starts with a ‘book a call’ form submission, if they do not proceed to actually complete the form and create a follow up phone call up as a hot sales lead
‘read the blog’ link is a somewhat passive call to action and would be a great one to create a follow up phone call as a warm sales lead
To insert the phone call activity add a ‘Activate a custom trigger’ element into the journey and define the attributes accordingly. You can use dynamic inputs from an attribute on the lead or a static free text input.
Do not schedule a phone call if the lead has already booked a call
One of my favourite things about real time journeys is the ability to end a journey at any point if a specific action occurs. In this case if the lead goes ahead and books a call with us, there is no need to create a follow up phone call, or continue on their nurture path. By defining an alternate exit to the journey when a marketing from ‘Book a call’ is submitted we can ensure that all sales efforts are directed in the most necessary directions.
Sit back and watch the magic happen
The final step, when you are ready, is to set the journey live and let the automation do the work for you from here.
full end to end screenshot of the power automate flow that creates the phone call activity from the journey in Dynamics 365 Marketing


