Using Power Automate with Azure Queues & Cognitive Services for AI fuelled social media analytics
In a previous article [1] I shared an immersive, AI enriched social media monitoring and analysis model driven app to monitor any Twitter hashtags or mentions of your choice! This article is going to take a technical deep dive into how we leveraged Power Automate to integrate Twitter with a range of Azure services

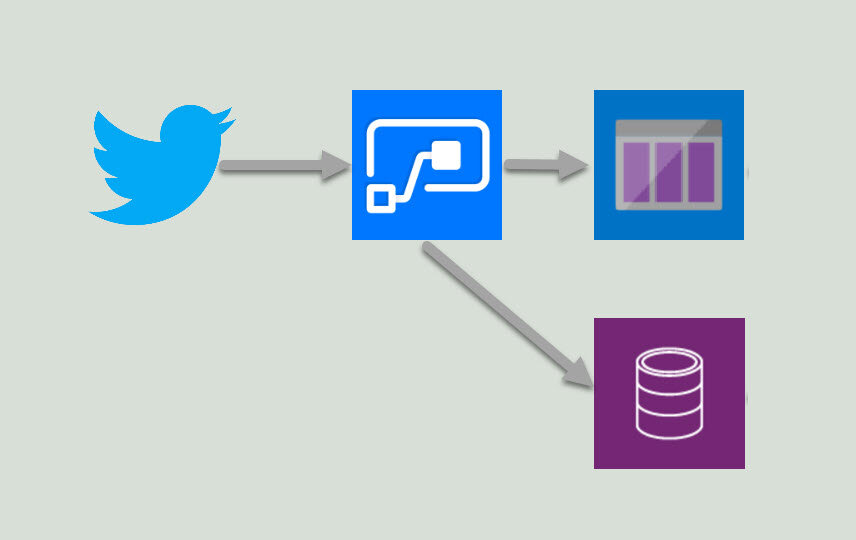
The ins and outs behind the scenes to get from Tweet to Azure
This post will focus on the data processing and enrichment, a future post will look into how we visualised and surfaced the data in the model driven app so watch out for that coming soon.
Power Automate
Capture the tweet data, establish unique identifiers in the DataFlex Pro for the model driven app, calculate location and pass a message to an Azure Queue
Azure
We leverage Azure Functions, Queues, Cognitive Services & Cosmos DB to do the following:
Consume messages from a queue with Azure Functions & integrate with Cognitive Services
Write data to Cosmos DB
Write messages to a queue which can be consumed by Power Automate
Visualise data in a web app
Part 1: capture Tweet data, calculate location & send to Azure

There are many ways to get data from twitter but that involves polling, finding an NPM (Node Package Manager), setting up API keys and hoping you don’t get rate limited. Plus some heavy ongoing maintenance to keep it up and running.
Fortunately the Power Platform has a pre-built connector to capture posts from Twitter based on a specific hashtag (#) or mention (@) - this will be used as the trigger to start our flow.
The twitter handle is set by combining the ‘@’ symbol with the ‘Tweeted By’ data attribute from Twitter using the expression: concat('@',triggerOutputs()?['body/TweetedBy'])
Next, we start to establish unique record identifiers for the Tweets and the Tweeter to later on when receiving the message from Azure. This starts with the Tweeter - a ‘Contact’ in Dataflex, so first we check if the Tweeter is already known to us, if so capture the ID for that record, if not create one.
When using the ‘List record’ feature, even when you limit the top count to 1 the outputs will automatically create a loop for each item returned, it gets messy and we only want the first match, to prevent this we use the formula:
first(outputs('Search_for_contact_with_twitter_handle')?['body/value'])?['contactid']
Then we want to check the output from the search to see if the contact exists, we do this by checking if the list records returned any results using the formula:
empty(body('Search_for_contact_with_twitter_handle')?['value'])
Based on this condition we then either get the existing record or create a new one


Now we can capture the Contact ID in the variable we created earlier, include the ID from each condition above as we are guaranteed that only one of them will ever be populated
Then create the Twitter record in DataFlex to establish the Twitter ID which can be passed to and returned from Azure. The name field is made unique by rebuilding the tweet URL from the values returned from the Twitter connector.
Some of the data enhancements can be made within Power Automate, Azure does not have to do all the heavy lifting. Where the data is available we can use the Bing Maps connector to calculate the longitude and latitude of the tweeters profile location. We search on city by spiting the location string to take only the words before the first comma (,) using the following formula:
first(split(triggerOutputs()?['body/UserDetails/Location'], ','))
Then convert the longitude and latitude outputs from Bing from a string to a floating point number which can be used later by our PCF map control using the following formula:
float(variables('Longitude')) & float(variables('Latitude'))

Previously blogged about this here -> https://www.ameyholden.com/articles/locate-tweets

We cannot guarantee the Tweeters location will be populated or appropriately set to search on city, so for these steps you must configure the run after to fire on a failure
Now we are ready to pass out a message to an azure queue that provides all the information it needs to enrich the data and send it back in a way which can be pushed back into DataFlex Pro.

We use two replace functions to switch between the correct text for the tweet. This is because the connectors provides two types. If its a retweet we must use the ;’OriginalTweet’, the ‘Tweet text’ is concatenated at 140 characters but if its a tweet ’OriginalTweet’ is blank and the ‘Tweet text’ is the one we need. JSON does not link blank variables so these formula replace blank with ‘‘ to prevent this.
replace(triggerOutputs()?['body/TweetText'], '"', '\"')
if(equals(triggerOutputs()?['body/OriginalTweet/TweetText'], null), '', replace(triggerOutputs()?['body/OriginalTweet/TweetText'], '"', '\"'))

Edited to add full code snippet for sending the queue message to Azure
{
  "location": {
"lat": "@{variables('Latitude')}",
"lon": "@{variables('Longitude')}"
  },
  "tweet":  {
    "text": "@{replace(triggerOutputs()?['body/TweetText'], '"', '\"')}",
    "user": "@{triggerOutputs()?['body/UserDetails/Id']}",
    "url": "https://twitter.com/@{triggerOutputs()?['body/UserDetails/Id']}/@{triggerOutputs()?['body/TweetId']}",
"id": "@{outputs('Create_Tweet_record')?['body/aeh_twitterid']}",
"originalText": "@{if(equals(triggerOutputs()?['body/OriginalTweet/TweetText'], null), '', replace(triggerOutputs()?['body/OriginalTweet/TweetText'], '"', '\"'))}",
"originalTweetId": "@{triggerOutputs()?['body/OriginalTweet/TweetId']}",
"originalTweetUser": "@{triggerOutputs()?['body/OriginalTweet/UserDetails/Id']}"
  },
"id": "@{outputs('Contact_GUID')}"
}
Finally, you may also see that we do another parallel step here which is checking to see if its a tweet or a retweet - this relates to the gotcha I mentioned above on the multiple ‘Tweet Text’ holding variables. For a more detailed breakdown on this one check out my previous article [2]

Part 2: enrich and visualise data in Azure
This is where we hand over to the magic of Azure to enrich the data and create a web app visualisation, the full code package can be found on GitHub [3] but three important snippets to highlight here are:
Capture the input from the Azure Queue in which the message was sent to us, cleaning the data a bit and making it a JavaScript Object
let parsedInput: QueueInput;
  if (typeof input === "string") {
    try {
      parsedInput = JSON.parse(input.split("\n").join(" "));
    } catch (e) {
      console.error(e);
      console.error(input);
    }
  } else {
    parsedInput = input;
  }
Call the helper functions that will talk to Cognitive Services and do our machine learning
const [sentimentResult, keyPhraseResult] = await Promise.all([
    processSentiment(client, parsedInput.tweet.id, parsedInput.tweet.user, parsedInput.tweet.url, text, context.log),
    processKeyPhrases(client, parsedInput.tweet.id, parsedInput.tweet.user, parsedInput.tweet.url, text, context.log),
  ]);
Pop a new message on an Azure Queue for Flow to pick up
const results = {
    id: parsedInput.tweet.id,
    keyPhrases: context.bindings.keyPhrasesDoc.keyPhrases,
    sentimentLabel: context.bindings.sentimentDoc.sentiment[0].sentiment,
    sentimentRating: context.bindings.sentimentDoc.sentiment[0].confidence,
  } as AIResult;

  context.bindings.queuedResults = results;

Finally we store the enriched data in Cosmos DB and surface it in an Azure Web App as a Key Phrase word cloud! We will come back to this beauty later in the next article to bring this into out Model Driven App
Whats next?
There is no point enriching the data in Azure if were not going to get something back out of it into our model driven app. The next article will explore how we receive a message from an Azure queue to update DataFlex Pro. Then build a key interface to all the data with Model Driven Apps & Power App Component Framework to display this data to users in ways which create an enjoyable user experience.
1) Retrieve and store the enriched data from Azure into Dataflex
2) Surface the data and visualisations in a Model Driven app
Dashboards to visualise and drill down on the tweet data with simple user driven point & click filtering
Many to Many relationship between Key Phrase & Tweets so drill down can be seen from both the tweet and the particular key phrase
3) Extend the model driven app user interface with PCF
Embedded twitter feed https://pcf.gallery/twitter-pcf-control/
Plotting tweets on a map https://pcf.gallery/google-maps-control/
Website URL previews (available with Dynamics 365)
Custom URLs based on the tweeters details https://pcf.gallery/custom-url-control/
[1] A GIF heavy overview on social media monitoring & analytics with the Power Platform and Azure https://www.ameyholden.com/articles/azure-javascript-pcf-social-media-monitoring-analysis
[2] Locate tweets with Power Automate & Tweet Text Gotchas - https://www.ameyholden.com/articles/locate-tweets
[3] Git Hub for the Azure magic behind the scenes from part 2 -> https://github.com/aaronpowell/event-twitter-insights