Browse and Search Segment Membership in Customer Insights - Journeys
This piddly grid in Customer Insights - Journeys real-time marketing segments is the bane of my life for verifying queries and checking the expected contacts or leads are the segment. No sorting, no searching, and very minimal columns to choose from. Wah!

Imagine if I just ended the blog post here… tempting. Buty I won’t becauseeeeee…
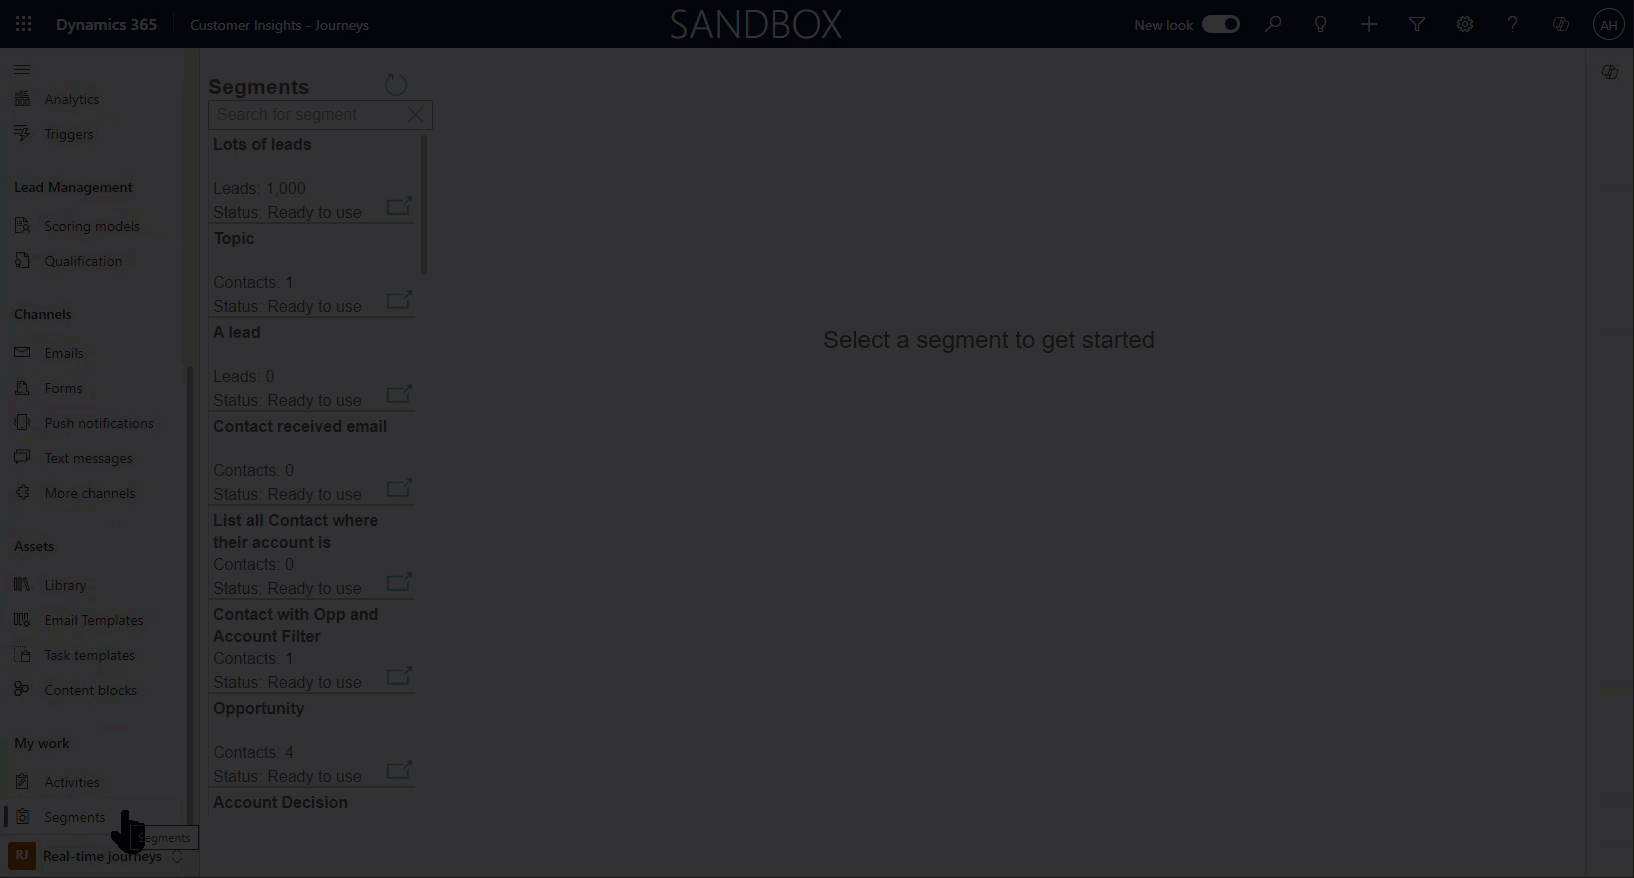
I built a really cool custom page to browse and search segments in real-time marketing!
Pretty cool huh? In this post I will show you the essential pieces to retrieve the segment member details into the custom page to create the browse and search experience. There is quite a bit of detailed work on the custom page side of things to aid the user experience which would take me years to document. But I think this will give you more than enough to get going in the right direction.
A bit of background detail on Customer Insights - Journey segments
Segments are the magic sauce that you need to start a segment-based journey in Dynamics 365 Marketing (Customer Insights - Journeys). It’s a way of creating a data driven list of ‘members’ (contacts, leads or ‘unified profiles’ from Customer Insights - Data) who you want to send through an automated journey.
For some high level info you can check out the official Microsoft Docs on building segments in Customer Insights - Journeys which covers a few basic happy path segment stories focusing on the classic N:1 story of a Lead associated to an Account. I have some helpful posts about how to tackle the more complex segments and scenarios.
Previously I have also posted about how to use Power Automate to:
access the members of a Customer Insights - Journeys segment here.
create and publish segments with Power Automate here.
Official developer docs on working with segments here.
Create a Custom Page
You will need to create a custom page and add it to your model-driven app navigation menu. You can find out more information about how to do this here.
Capture the Environment Base URL when the Custom Page is Opened (OnStart)
There are a few ways to do this, I like to use a child flow to fetch the environment URL
Flow Name: BUTTON | Get Environment URL
Use the trigger ‘When a Power App Calls a flow (v2)’. Add a Text Input called ‘UserAzureID’.
Add a ‘Dataverse - List rows’ action. Rename to ‘FindUser’.
Table Name: Users
Select columns: systemuserid,fullname
Filter rows: azureactivedirectoryobjectid eq '[UserAzureID]'
Row count: 1
Add a ‘Respond to a Power App or flow’ action. Add a Text Input called ‘EnvironmentURL’. Add the below expression to the ‘EnvironmentURL’ output.
urihost(body('FindUser')?['@odata.context'])


Add the flow into your cutome page, then in the OnStart property of your custom page use the below expression to call the flow and retrieve the ‘Environment URL’
Set(varEnvURL,'BUTTON|GetEnvironmentURL'.Run(User().EntraObjectId))
Add a Segment Gallery
To allow the user to browse the available segments you need to add a gallery. Add the data source ‘msdynmkt_virtualsegment’ into your app.

Set the Gallery ‘Items’ property to filter to only show Customer Insights - Journeys segments (not outbound ones).

SortByColumns(
        Filter(
            Segments,
            Source = 'Source (Segments)'.'Customer Insights - Journeys'
        ),
        "msdynmkt_createddate",
        SortOrder.Descending
    )
Add some details into the gallery such as:
Name: ThisItem.Name
Member count: ThisItem.Members
Status: ThisItem.'Status Reason'
Add a launch icon and set the ‘OnSelect’ property to open the segment when selected:
Launch("https://"&varEnvURL.environmenturl&"/main.aspx?pagetype=entityrecord&etn=msdynmkt_segmentdefinition&id=" & ThisItem.'Source entity id',{},LaunchTarget.New)
Bonus features: search bar on the gallery
Show the right message depending on the segment status
We cannot retrieve members of a segment that is in Draft status, so it’s important to show the right message to the user based on the selected segment status. Add a text label, set the ‘Text’ property as follows:
If(
    CurrentItem.'Status Reason' = 'Status Reason (Segments)'.'Ready to use' && !varFlowInProg && !varFlowExportInProg,
    "Use the 'Load Members' button to start browsing segment members",
    If(
        varFlowInProg,
        "Loading members please wait...",
        If(
            varFlowExportInProg,
            "Exporting members please wait...",
            If(
                !IsBlank(CurrentItem.Name),
                "The segment status must be 'Ready to use' before browsing the segment members",
                "Select a segment to get started"
            )
        )
    )
)
Add a button to ‘Load Members’
We can also use the status rules above to make this button change the text, based on the status and therefore change what it does too. Add a button, update the ‘Text’ property as below, rename the button to ButtonLoadMembersOpenSegment so you can find it later.
If(
    CurrentItem.'Status Reason' = 'Status Reason (Segments)'.'Ready to use',
    "Load Members",
    If(
        !IsBlank(CurrentItem.Name),
        "Open Segment",
        ""
    )
)
Create a flow to retrieve segment members
I wrote all the steps for you to retrieve member data from Customer Insights - Journeys segments in Power Automate.

As this flow is being called from a custom page, the standard timeout of 120 seconds (2 minutes) applies so I recommend you stress test the limit on how many segment members you can feasibly return. If you need better performance you might want to consider using a Power Automate per flow/process plan to increase its performance profile, use logic apps, or use one of the flow timeout work arounds instead. You should be ok in the 5000 row region and probably more but performance has lots of other factors at play than just row counts.
Update the button to call the flow
Now that you have your magic segment converting flow up and running, we can now use it to retrieve the contact or lead data back into a gallery on the custom page for browsing and searching. Or maybe even exporting 😉.
Update the button ButtonLoadMembersOpenSegment OnSelect property so that when a segment is selected, and the button says '“Load Members” the flow is called to retrieve the members. Otherwise if the button says '“Open Segment” (because the status is not ‘Ready to use’) then the segment is opened into a separate window for editing.
If(
    Self.Text = "Load Members",
    Set(
        varFlowInProg,
        true
    );
    Set(
        varFlowResponse,
        'BUTTON|Getsegmentmembers'.Run(
            CurrentItem.Segment,
            User().EntraObjectId,
            CurrentItem.'Base entity'
        )
    );
    Set(
        varFlowInProg,
        false
    ),
    If(
        Self.Text = "Open Segment",
        Launch(
            "https://" & varEnvURL.environmenturl & "/main.aspx?pagetype=entityrecord&etn=msdynmkt_segmentdefinition&id=" & CurrentItem.'Source entity id',
            {},
            LaunchTarget.New
        )
    )
)
Bonus feature: show a loading spinner while the flow is running. Use the variable varFlowInProg to show/hide the spinner. Create a spinner GIF here.
Add a gallery to display the segment member data
Now we need somewhere to display the data we returned. First we need a search box, because not adding one here is a violation of the custom pages purpose in life. Add a ‘Text Box’ input, name it ‘MemberSearchText’. Update the ‘Placeholder’ property as show below, so that it says “Search contacts” or “Search leads” according to what segment they chose.
"Search "&CurrentItem.'Base entity'&"s"

Add a Blank Vertical Gallery, set the ‘Items’ property as show below, the items you define in the Search() function need to be items returned from your flow and defined the final ‘Response’ step of the flow, you can add/remove these as you will likely have custom columns or preferences on search filters.
If(
    !IsBlank(MemberSearchText.Value),
    SortByColumns(
        Search(
            varFlowResponse,
            MemberSearchText.Value,
            fullname,
            emailaddress1,
            '_parentcustomerid_value@OData.Community.Display.V1.FormattedValue',
            '_ownerid_value@OData.Community.Display.V1.FormattedValue',
            '_msdynmkt_marketingformid_value@OData.Community.Display.V1.FormattedValue',
            '_parentaccountid_value@OData.Community.Display.V1.FormattedValue',
            companyname,
            '_parentcustomerid_value@OData.Community.Display.V1.FormattedValue'
        ),
        "fullname",
        SortOrder.Ascending
    ),
    SortByColumns(
        varFlowResponse,
        "fullname",
        SortOrder.Ascending
    )
)
Add labels to the gallery to show data

How to see if the segment is based on leads or contacts
To show data inside the gallery you need to add some labels which display the data returned to the gallery items in ‘varFlowResponse’. Remember that the grid might show leads or contacts so we need to make sure we can show data from both of these tables. Many columns are shared between Lead and Contact such as fullname, emailaddress1 and ownerid but some are unique. You could use an If() condition to show the right item depending on the table name (which can be found under CurrentItem.'Base entity') or by using Coalesce() which just finds the first value that is not blank.
I’m using out of the box columns for the example below but I would highly encourage you to look at what custom columns you use that are most meaningful to your users and needs!
The Full Name is easy as its the same for contact or lead. Add the label inside the gallery, update the ‘Text’ property to ThisItem.fullname

Now for a move complicated one. This label with show the company name but this can come from many places.
Account/’Company Name’ lookup on the contact - ThisItem.'_parentcustomerid_value@OData.Community.Display.V1.FormattedValue'
Parent account lookup on the lead - ThisItem.'_parentaccountid_value@OData.Community.Display.V1.FormattedValue'
Free text company name on the lead - ThisItem.companyname
Coalesce(
    ThisItem.'_parentcustomerid_value@OData.Community.Display.V1.FormattedValue',
    ThisItem.'_parentaccountid_value@OData.Community.Display.V1.FormattedValue',
    ThisItem.companyname
)
Another example is where you just want show completely different data for Lead/Contact for example the Status Reason of a lead is important and useful, whilst the Status Reason of a Contact less so. In this example I am showing statuscode for leads and preferredcontactmethodcode for contacts. I know that statuscode will be ‘blank’ for contacts because I am not returning it in the flow ‘Response’ action.
Coalesce(
    ThisItem.'statuscode@OData.Community.Display.V1.FormattedValue',
    ThisItem.'preferredcontactmethodcode@OData.Community.Display.V1.FormattedValue'
)
Note that if you are referencing a text column you can use just the logical name, but if its anything else you will need to reference the @OData.Community.Display.V1.FormattedValue property to get the user friendly formatted result. You can use any data attributed that you return in the ‘Response’ action of your flow.
PS. I know I didnt rename the labels and I’m a terrible human for it, please forgive me
Add an icon to open the row from the gallery
This handy little icon opens the lead/contact row in a new window so that individual rows can be viewed in detail as part of verifying the segment membership. I set the property ‘Icon’ to Icon.OpenInNewWindow, then the ‘OnSelect’ property as below:
Launch(
"https://" & varEnvURL.environmenturl & "/main.aspx?pagetype=entityrecord&etn=" & CurrentItem.'Base entity' & "&id=" & Coalesce(
ThisItem.contactid,
ThisItem.leadid
),
{},
LaunchTarget.New
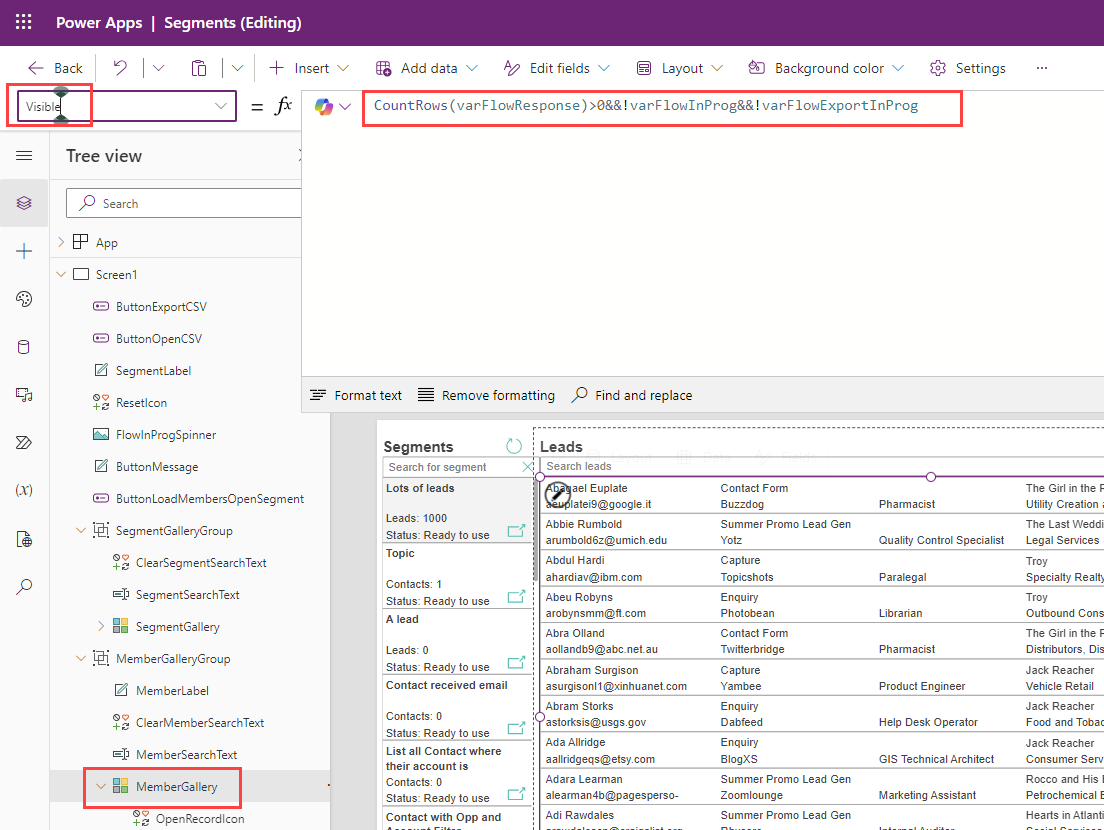
)You can also hide the gallery when it’s empty by setting the ‘Visible’ property as shown below:
CountRows(varFlowResponse)>0&&!varFlowInProg&&!varFlowExportInProg
Add extra polish, please
So this covers the key moving parts that you need to bring the custom page to life for searching and browsing segments. There is certainly extra polish you can add that can be seen in the video below which I have not gone into detail on here. Also it’s important to customise this to suit the customisation your system has in place for leads and contacts to make it even more useful.
P.S. Those of you with a keen eye might notice the ‘Export CSV’ button too but that’s for another day of awe and wonder.
Questions? Ideas? Suggestions? Leave a comment below, I’m happy to try and help you out!